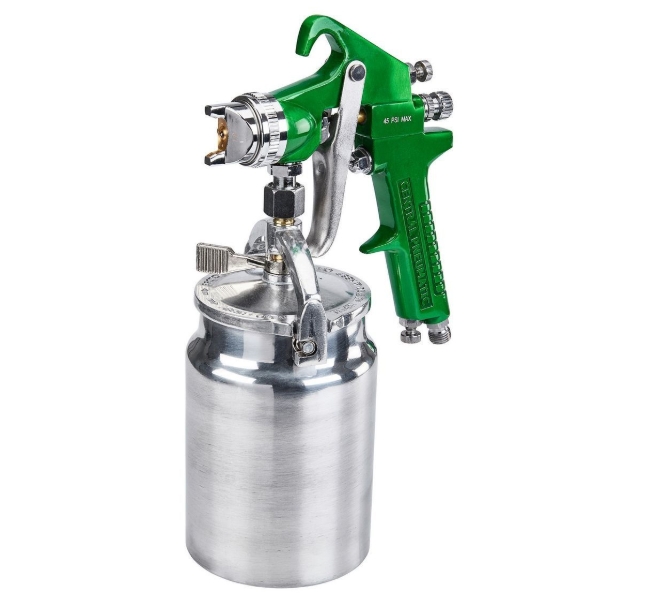
CENTRAL PNEUMATIC 32 oz. Siphon-Feed Spray Gun
- This general purpose siphon-feed spray gun has a coated aluminum body combined with a removable fluid nozzle and air diffuser for quick and easy cleaning. Ideal for use with low viscosity paints, lacquers, enamels, stains and urethanes, this paint spray gun has ergonomic knobs for precise control. Rugged construction and long-life seals make this spray gun durable enough for regular use.
- Suitable for low viscosity paints, lacquers, enamels, stains and urethanes
- Coated aluminum body and removable air diffuser for easy cleaning
- Ergonomic knobs for precise control of fluid, air flow and spray pattern
- Lightweight aluminum construction
- Long-life seals
$39.99
When I first decided to tackle my own painting projects, I was overwhelmed by the options available. After countless hours of research and several paint-splattered weekends later, I’ve become something of an expert on the Central Pneumatic Siphon Feed Spray Gun. If you’re considering this affordable workhorse for your DIY arsenal, this comprehensive guide will walk you through everything you need to know before making your purchase. Finding the right spray gun can transform your painting projects from tedious chores into satisfying creative experiences.
My First Encounter with the Central Pneumatic
Let me take you back to three years ago. I was staring at my grandmother’s antique dresser, wondering how I’d ever restore it to its former glory without spending a fortune on professional refinishing. A contractor friend suggested I try the Central Pneumatic Siphon Feed Spray Gun from Harbor Freight. “It’s inexpensive but does the job,” he said. Skeptical but desperate, I took his advice.
That modest investment changed everything about how I approach painting and finishing projects. Today, that dresser sits proudly in my entryway, its smooth, flawless finish belying its DIY origins. I’ve since used my trusty spray gun for everything from furniture to fence staining, and I’m excited to share what I’ve learned along the way.
Understanding How It Works: The Magic Behind the Spray
Before diving into specifics, let’s understand what makes a siphon feed spray gun unique. Unlike gravity feed models, the Central Pneumatic Siphon Feed Spray Gun has its paint cup positioned below the gun. When you pull the trigger, compressed air creates a vacuum that pulls (or “siphons”) the paint up and out through the nozzle.
This design offers several advantages. For one, you can orient the gun at various angles without worrying about paint spilling. The siphon mechanism also handles thicker paints well, making it versatile for different projects. The downside? It typically requires more air pressure than gravity-fed alternatives.
The Central Pneumatic spray gun operates using the venturi principle – as air rushes through the gun, it creates a pressure differential that draws paint up from the cup and atomizes it into a fine mist. The gun features several adjustments to control airflow, paint volume, and spray pattern, giving you tremendous control over the application.
I remember my first test spray with a piece of scrap wood. The way the paint flowed evenly, creating a smooth surface without brush marks, was nothing short of miraculous to my novice eyes. That moment hooked me on spray finishing.
Price Point: Is It Really a Bargain?
Let’s talk about what’s likely on your mind first: the price. The Central Pneumatic Siphon Feed Spray Gun typically retails between $15-30, depending on whether you catch it on sale. Mine cost $19.99 during a weekend promotion, and I’ve seen it as low as $14.99 with coupons.
This price point places it firmly in the budget category, especially when compared to professional models that can cost $100-300. But the question remains: is it a false economy? Will you end up replacing it soon?
After three years of regular use, I can confidently say this gun delivers exceptional value. While it lacks the refined engineering of premium models, it performs admirably for most home projects. I’ve completed furniture refinishing, fence staining, and even automotive touch-ups with results that have impressed even my most critical friends.
For perspective, I once borrowed a friend’s $200 HVLP gun for a cabinet project, and while it was slightly more efficient with paint and had marginally better atomization, the final result wasn’t noticeably superior to what I achieve with my Central Pneumatic.
Where to Purchase: Finding Your New Painting Companion
The Central Pneumatic Siphon Feed Spray Gun is primarily sold through Harbor Freight Tools. You can purchase it:
- In-store at any Harbor Freight location (approximately 1,000+ stores across the US)
- Online through the Harbor Freight website
- Occasionally through third-party marketplaces like eBay or Amazon (though I recommend buying direct for warranty purposes)
I bought mine in-store, which I recommend if possible. This allowed me to inspect the packaging and ask questions from staff. Harbor Freight regularly offers coupons and sales that can bring the price down further. I’ve made it a habit to check their weekly flyer before making any tool purchases.
One tip: if you’re buying in-store, check the box thoroughly. While quality control is generally good, I’ve heard of occasional issues with missing parts. My experience was perfect – everything was properly packaged and intact.
Perfect for Beginners? My Experience Starting Out
When I first held my Central Pneumatic spray gun, I was intimidated. Would I create a beautiful finish or a drippy mess? If you’re a beginner wondering the same thing, I have good news.
The Central Pneumatic Siphon Feed Spray Gun is exceptionally beginner-friendly, offering an ideal balance between affordability and performance for those just starting their painting journey. Its straightforward design and simple adjustments make it less intimidating than more complex models.
My learning curve was surprisingly short. Within an hour of practice on scrap materials, I was achieving consistent results. The gun is forgiving of minor technique errors, which helped build my confidence. The simple adjustment knobs for air, fluid, and pattern control are intuitive, even without prior experience.
Another beginner-friendly aspect is that if you make mistakes while learning (which you will), you won’t be ruining an expensive tool. I accidentally left paint to dry in mine overnight once – a rookie error that could have been disastrous with a premium gun. After some thorough cleaning with solvent, it was working perfectly again.
What Do Others Say? Honest Reviews and Feedback
I’m not alone in my positive assessment. The Central Pneumatic Siphon Feed Spray Gun typically averages 4 out of 5 stars in customer reviews. Common praises include:
- “Incredible value for the price”
- “Perfect for weekend warriors and DIYers”
- “Surprisingly durable for a budget tool”
- “Produces results comparable to more expensive models”
Critical reviews tend to mention:
- Occasional leaking around the cup connection
- Limited longevity with heavy professional use
- Inconsistent quality control between units
- Slightly higher overspray compared to HVLP models
My neighbor Tom, a retired cabinetmaker, borrowed mine for a small project and remarked, “For a Harbor Freight tool, this is surprisingly capable. I wouldn’t use it professionally every day, but for homeowner projects, it’s more than adequate.”
A painting contractor I met at a home improvement workshop was less charitable: “It’s fine for occasional use, but if you’re doing this professionally, invest in something better.” That’s fair advice – this is positioned as a DIY tool, not a professional-grade instrument.
Setup Made Simple: Getting Started Right
Setting up your Central Pneumatic spray gun correctly is crucial for good results. Here’s my step-by-step process:
- Unbox and inspect: Check all components are present and undamaged. You should have the gun, paint cup, lid, and usually a cleaning brush.
- Attach to air compressor: Use thread seal tape on the connections to prevent air leaks. The gun connects to a standard 1/4″ quick-connect fitting.
- Test air flow: Before adding paint, pull the trigger to ensure air flows freely and consistently.
- Prepare your paint: Strain and thin your paint according to manufacturer recommendations (more on this later).
- Fill the cup: Never fill beyond 3/4 capacity to prevent overflow and allow proper siphoning.
- Test spray pattern: Spray on cardboard or scrap material to check your pattern and make adjustments.
- Fine-tune settings: Adjust air pressure and fluid control until you achieve desired results.
The first time I set up mine took about 20 minutes. Now I can go from box to spraying in under 5 minutes. The connections are standard, and no special tools are required beyond an adjustable wrench.
One setup tip I learned the hard way: always use a moisture trap in your air line. My first project had tiny water spots in the finish because I skipped this inexpensive accessory. A basic moisture filter costs about $15 and prevents humidity in your air supply from ruining your work.
Air Pressure Requirements: Powering Your Spray Gun
One common question is: “What size air compressor do I need?” This was my biggest concern when starting out, as I only had a small 2-gallon compressor.
The Central Pneumatic Siphon Feed Spray Gun requires 40-60 PSI for optimal operation, with an air consumption rate of approximately 4-6 CFM (Cubic Feet per Minute). This means:
- Small 2-3 gallon compressors will work but with frequent cycling
- A medium 6-gallon compressor is ideal for most home projects
- Larger compressors will allow for continuous spraying
My initial 2-gallon compressor worked fine for small projects, but I would have to pause occasionally to let it catch up. I’ve since upgraded to a 6-gallon model which handles most projects without interruption. For large jobs like fences or decks, a bigger compressor is definitely worth considering.
I’ve found that running at around 45-50 PSI gives me the best balance of atomization and control with most paints. Too low, and the paint doesn’t atomize properly; too high, and you’ll get excessive overspray and waste paint.
One pressure-related tip: invest in a regulator with a moisture trap if your compressor doesn’t have one built-in. This allows precise pressure control and prevents water contamination in your finish.
Automotive Applications: Can It Handle Car Paint?
When my brother’s vintage Mustang needed touch-up work on a door panel, I was hesitant to offer my services with the Central Pneumatic. Could a budget spray gun really handle automotive finishing?
The answer is a qualified yes. While the Central Pneumatic Siphon Feed Spray Gun can be used for automotive painting, it has limitations. It works well for:
- Small touch-up jobs
- Single panel repairs
- Painting trim pieces
- Undercoating and primer application
However, it’s not ideal for full auto paint jobs where premium finishes and perfect color matching are critical. Professional automotive painters typically use more sophisticated HVLP systems with finer atomization.
For my brother’s door panel, I used automotive acrylic enamel thinned according to the manufacturer’s specifications. After proper prep and several light coats, followed by clear coat, the results were impressive. The casual observer couldn’t tell it was a DIY repair. However, a professional might notice subtle differences in the finish quality.
If you’re considering automotive use, I recommend practicing extensively on scrap metal panels first. Auto painting is less forgiving than furniture or walls, and technique matters tremendously.
Paint Compatibility: What Can You Spray?
One of the most versatile aspects of the Central Pneumatic gun is its ability to handle various coating types. I’ve successfully used:
- Latex paints (properly thinned)
- Oil-based paints
- Primers
- Stains and sealers
- Polyurethane
- Some lacquers
- Enamels
The key is proper thinning. Most paints need to be thinned to achieve the right viscosity for spraying. A general rule of thumb is 10-15% thinner for most applications, but always follow the paint manufacturer’s recommendations.
Latex paints, which I use most frequently, typically require thinning with water at a ratio of about 10%. I use a viscosity cup (a simple funnel-like measuring device) to ensure consistency. If the paint flows through the cup in 25-30 seconds, it’s usually at the right viscosity for this gun.
One of my most successful projects was applying thinned polyurethane to a dining table. The spray application eliminated brush marks completely, resulting in a glass-like finish that still looks perfect two years later.
Keeping It Clean: Post-Project Maintenance
Perhaps the most important advice I can give: thorough cleaning after each use is essential for maintaining your spray gun’s performance and extending its lifespan. Dried paint is the enemy of spray equipment.
Here’s my cleaning routine:
- Empty excess paint back into the original container
- Add appropriate solvent to the cup (water for latex, mineral spirits for oil-based)
- Spray the solvent through the gun until it runs clear
- Disassemble the gun (nozzle, needle, air cap)
- Soak metal parts in solvent
- Clean all passages with the included brush or pipe cleaners
- Rinse with clean solvent
- Reassemble and spray a final burst of clean solvent
- Add a drop of air tool oil to the trigger mechanism
This process takes me about 15 minutes, which seems tedious but is worth every second. I once rushed cleaning and paid the price with clogged passages that took hours to resolve. Another tip: never use metal tools to clean the nozzle or air cap – they can damage the precision openings. Wooden toothpicks work well for stubborn clogs.
For deep cleaning every few projects, I completely disassemble the gun and soak all metal parts overnight in the appropriate solvent. This removes any built-up residue that normal cleaning might miss.
Technical Specifications: The Numbers That Matter
For those who appreciate the technical details, here are the specifications of the Central Pneumatic Siphon Feed Spray Gun:
- Cup capacity: 1 quart (946ml)
- Operating pressure: 40-60 PSI
- Air consumption: 4-6 CFM @ 40 PSI
- Nozzle size: 1.5mm (standard)
- Air inlet: 1/4″ NPT
- Weight: Approximately 1.5 lbs (without paint)
- Spray pattern width: Adjustable, up to 8-10 inches
- Construction: Die-cast aluminum body with brass nozzle
These specifications put it firmly in the conventional spray gun category rather than HVLP (High Volume Low Pressure). This means it’s slightly less efficient with paint (more overspray) but requires less air volume to operate effectively.
The 1.5mm nozzle is a versatile size that handles most common coatings. For very thin stains, it’s slightly large, and for thicker materials like unthinned latex, it’s a bit small. However, it strikes a good balance for general-purpose use.
Mastering Adjustments: Controlling Your Spray Pattern
One of the features that impressed me most was the adjustability of the spray pattern. The Central Pneumatic offers three primary adjustments:
- Pattern Control Knob: Located at the top of the gun, this adjusts from a round pattern (ideal for detail work) to a wide fan (perfect for large surfaces). I typically use a wider pattern for broad surfaces like cabinet sides and a narrower pattern for trim and edges.
- Fluid Control Knob: This regulates how much paint flows through the gun. For thin materials like stains, I open it more; for thicker paints, I restrict the flow to prevent runs and sags. Finding the right balance takes practice, but becomes intuitive quickly.
- Air Pressure Adjustment: Controlled at your compressor or inline regulator, this affects atomization. Higher pressure creates finer atomization but increases overspray; lower pressure gives more control but can result in a textured finish if too low.
The most common mistake beginners make (myself included) is applying too much paint too quickly. The beauty of spray painting comes from building up thin, even coats rather than trying to cover everything in one heavy pass.
I’ve found that maintaining 6-8 inches from the surface, moving at a consistent speed, and overlapping each pass by about 50% produces the best results. Always start your stroke before squeezing the trigger and continue after releasing it to avoid heavy spots at the beginning and end of each pass.
Common Problems and Solutions: Troubleshooting Tips
Even a well-maintained spray gun occasionally develops issues. Here are the most common problems I’ve encountered and how to solve them:
Spitting or Inconsistent Spray
- Cause: Partially clogged nozzle or dried paint in the air cap
- Solution: Clean thoroughly, paying special attention to the tiny holes in the air cap
Paint Leaking Around Needle
- Cause: Worn packing or loose packing nut
- Solution: Tighten the packing nut slightly (don’t over-tighten) or replace packing if worn
Orange Peel Texture
- Cause: Paint too thick, air pressure too low, or spraying too far from surface
- Solution: Thin paint further, increase air pressure, or move closer to the work surface
Runs and Sags
- Cause: Moving too slowly, holding too close to surface, or applying too much material
- Solution: Move at a consistent speed, maintain proper distance, reduce fluid flow
Excessive Overspray
- Cause: Air pressure too high or improper technique
- Solution: Reduce air pressure and hold gun perpendicular to surface
My worst experience was a clogged air cap that created an uneven spray pattern. After 30 minutes of careful cleaning with the included brush and some compressed air, it was working perfectly again. Most issues can be resolved with proper cleaning and minor adjustments.
Warranty Coverage: What’s Protected
The Central Pneumatic Siphon Feed Spray Gun typically comes with a 90-day warranty from Harbor Freight. This covers manufacturing defects but not wear and tear or damage from improper use.
In my experience, Harbor Freight honors this warranty without hassle if you encounter legitimate issues. When a friend bought one with a manufacturing defect in the air valve, they exchanged it immediately with no questions asked.
That said, the warranty period is shorter than many premium tools, reflecting its budget positioning. I recommend testing your gun thoroughly within the first few days of purchase to identify any potential defects while still covered.
For peace of mind, Harbor Freight often offers extended protection plans at checkout for a few dollars more. I declined this option, figuring at the price point, replacement would be more practical than repair if something failed after the warranty period.
Furniture Painting: A Perfect Match
Furniture refinishing is where this spray gun truly shines. The control and finish quality it offers transform ordinary pieces into professional-looking showpieces.
My first furniture project was a pine bookshelf that had seen better days. Using the Central Pneumatic, I applied primer and then two coats of satin enamel. The results were stunning – a smooth, consistent finish with no brush marks or roller texture.
Since then, I’ve refinished:
- A dining room table and six chairs
- Several dressers and nightstands
- A kitchen hutch
- Multiple smaller decorative pieces
The spray gun excels at getting into the nooks and crannies of chair spindles and detailed trim work. Areas that would be tedious and difficult with a brush become simple with the spray gun.
For furniture, I typically thin latex paint about 10% with water or use specialty cabinet and furniture paints designed for spraying. Straining the paint before use is essential to prevent clogs, especially with pigmented paints.
One furniture-specific tip: always disassemble as much as possible before painting. Removing hardware and separating components makes for cleaner lines and more thorough coverage in tight spaces.
Siphon vs. Gravity Feed: Understanding the Difference
When I first started researching spray guns, I was confused about the difference between siphon and gravity feed models. Having now used both types extensively, I can explain the practical differences:
Siphon Feed (Central Pneumatic):
- Paint cup mounted below the gun
- Uses vacuum action to draw paint upward
- Requires more air pressure (40-60 PSI typically)
- Handles thicker materials well
- Can be used at various angles
- Typically less expensive
- Generally more paint waste at the bottom of the cup
Gravity Feed:
- Paint cup mounted above the gun
- Uses gravity to feed paint into the gun
- Operates efficiently at lower pressures (25-35 PSI typically)
- Better for fine finishing work
- Limited to mostly upright positions
- Usually more expensive
- More efficient with paint (less waste)
For most homeowner projects, the siphon feed design of the Central Pneumatic offers more versatility. I can spray upward for ceilings or downward for decks without issue. The trade-off is slightly higher air consumption and marginally more overspray.
I eventually added a gravity feed gun to my collection for fine finishing work, but still reach for my Central Pneumatic for most projects. The siphon design is particularly advantageous when spraying large quantities of material, as the larger cup means fewer refills.
Paint Mixing: Getting the Consistency Right
Proper paint mixing is crucial to success with any spray gun. With the Central Pneumatic, I’ve developed a reliable system:
- Start with room-temperature paint (cold paint is thicker and harder to spray)
- Strain the paint through a fine mesh filter to remove any lumps
- Begin with a small amount of appropriate thinner (water for latex, manufacturer-recommended thinner for others)
- Test viscosity using the “stick and drip” method or a viscosity cup
- Add thinner gradually until reaching the proper consistency
- Mix thoroughly but gently to avoid introducing air bubbles
For latex paints, I typically add 8-12% water. Oil-based paints usually need 10-15% mineral spirits or paint thinner. Specialty coatings like lacquer often have specific thinning instructions from the manufacturer.
A viscosity cup is a worthwhile investment at around $10. This simple device helps you achieve consistent results by measuring how quickly the paint flows through a calibrated opening. For most general applications with the Central Pneumatic, paint that flows through a #4 Ford cup in 25-30 seconds works well.
One caution: over-thinning can cause runs and reduce the durability of the final finish. It’s better to start with less thinner and add more gradually than to thin too much initially.
Safety First: Protecting Yourself and Others
My enthusiasm for spray painting was briefly tempered after my first project left me with a headache and irritated eyes. I quickly learned the importance of proper safety equipment.
When using the Central Pneumatic Siphon Feed Spray Gun, always use:
- A proper respirator (not just a dust mask) rated for paint vapors
- Safety glasses or goggles
- Gloves appropriate for your coating type
- Long sleeves and pants
- Adequate ventilation or, ideally, outdoor workspace
- Drop cloths and masking to protect surrounding areas
I’ve found that a dual-cartridge respirator with organic vapor filters provides excellent protection. At around $30-40, it’s a small investment for significant health protection. Even water-based paints contain chemicals you shouldn’t breathe.
Overspray is another safety concern. The Central Pneumatic produces more overspray than HVLP systems, so thorough masking is essential. For major projects, I set up a simple spray booth using plastic sheeting and box fans for ventilation.
Finally, never point the spray gun at yourself or others, and be mindful of wind direction when spraying outdoors. Paint mist can travel surprisingly far in a light breeze.
Long-Term Maintenance: Keeping Your Investment Working
After three years of regular use, my Central Pneumatic still performs like new. This longevity is due to a simple maintenance routine:
- After each use: Thorough cleaning as described earlier.
- Monthly: Apply a drop of air tool oil to the air valve and trigger mechanism to keep them operating smoothly.
- Quarterly: Complete disassembly and deep cleaning of all components. Check O-rings and packings for wear and replace if necessary.
- Storage: Store disassembled in a dry place with a drop of oil on metal parts to prevent corrosion.
Replacement parts are readily available and affordable. I’ve only needed to replace the needle packing once after about two years of use, which cost less than $5. Most wear items like O-rings and gaskets can be found at hardware stores if exact replacements aren’t available.
One maintenance upgrade I recommend is replacing the stock cup gasket with a slightly higher quality one. The original works fine but can harden over time. A silicone replacement stays flexible longer and provides a better seal.
Final Thoughts: Is the Central Pneumatic Right for You?
After countless projects and hundreds of hours of use, I can confidently say the Central Pneumatic Siphon Feed Spray Gun is one of the best tool values I’ve ever purchased. For approximately $20, it has saved me thousands in professional finishing costs and taught me valuable skills.
Is it perfect? No. Premium spray systems offer better efficiency, finer atomization, and more precise control. But at five to ten times the price, they’re overkill for most DIY enthusiasts.
The Central Pneumatic is ideal for:
- Weekend warriors tackling occasional projects
- First-time spray gun users
- Those with budget constraints
- General-purpose painting and finishing
- Learning spray techniques before investing in premium equipment
It’s less suitable for:
- Daily professional use
- Ultra-fine finishing where perfect results are critical
- Production environments where efficiency is paramount
My advice? If you’re curious about spray finishing but hesitant to invest heavily, the Central Pneumatic Siphon Feed Spray Gun offers the perfect low-risk entry point. Even if you eventually upgrade to a premium system, you’ll likely keep this one around for primer coats, quick projects, and situations where you don’t want to risk your expensive equipment.
The journey from brush-painting novice to spray finishing enthusiast has been rewarding, and this humble tool was my gateway. Whatever project you’re considering, I hope this guide helps you achieve the beautiful, professional-quality finishes that have brought me so much satisfaction.